I still remember the morning the red-and-white box showed up at my door. For weeks I’d been doom-scrolling Singer S0100 reviews and even deeper into the rabbit hole of Singer S0100 serger reviews, trying to figure out if a serger was going to be my best friend or my fussiest roommate. My old straight-stitch machine was fine for pillowcases, but my knit tees and towel edges always looked “homemade.” I wanted clean, stretchy, store-bought seams. Enter the SINGER S0100 serger.
Unboxing jitters
I sliced the tape, lifted the flaps, and… surprise: no thread on it. Some listings said it would arrive pre-threaded, but mine didn’t. Not a deal breaker, just a plot twist. I started hunting for the little accessories every video insisted I’d need — tweezers, screwdriver, extra needles. They weren’t on top, they weren’t in a bag, and for a hot second I thought mine shipped incomplete. Then I popped off the free-arm cover and there they were, tucked neatly inside like a secret compartment. Pro tip: the S0100 hides its goodies.
There was no thick paper manual either — just a card pointing me online. I downloaded the PDF and noticed the color codes for tension (B, G, P, Y) matched the dials on my machine, which was reassuring. Still, I’m a “show me” learner, so I lined up a couple of threading videos on my tablet.
The threading adventure
Everyone warns you about the lower looper. They’re not wrong. The upper thread paths? Easy. The lower looper? Like trying to thread a needle behind your back. I set up a bright desk lamp, grabbed the tweezers, and used a little piece of dental floss as a “lasso” to pull the thread through the tiny back hook. The moment the thread popped into place, I celebrated like I’d just defused a bomb.
Two micro-tips that helped me:
- I swung the blade out of the way to get more room near the needles.
- I stuck a bit of painter’s tape on each cone with the matching dial color so I could see at a glance which thread was misbehaving.
Ten minutes later I had a proper 4-thread overlock set up. I pressed the foot pedal and the motor gave a grumbly “ahem” before smoothing out. The machine isn’t whisper-quiet, but it’s not a jackhammer either. It did skitter on my table at first, so I parked it on a folded yoga mat. Rock solid after that.
First stitches, first grin
I fed in a scrap of cotton jersey and the SINGER S0100 serger ate it up — clean edge, stretchy seam, no puckers. I tried terry cloth next (hello, towel heaven). Then quilting cotton, then denim. The stitches were bold on denim and tidy on the knit. When one edge started looping too far off the side, a tiny tweak to the right needle tension fixed it. I stuck a sticky note by the machine with my “happy” settings for knits (3-3-3-4 on my unit, your mileage may vary).
No built-in waste catcher, so I clipped a little takeout container to the edge of my table with a binder clip. Instant thread bin. I also learned quickly that the S0100 doesn’t have a light right down by the loopers, so a cheap gooseneck lamp turned out to be my best accessory.
A couple of hiccups (and fixes)
On day two, the front cover was stubborn to open — my heart dropped because the machine won’t sew if it thinks the door’s open. A careful push on the latch and a firm swing did it. Later, the foot pedal had a moment where it didn’t respond. I unplugged, re-plugged, and it woke up. It hasn’t acted up since, but I did write down the support number just in case.
I also had to remove the needle plate once to fish out a stray thread I’d looped wrong (entirely my fault). Two screws, quick clean, back to stitching. Lint builds fast with a serger, so now I brush it out after every project and add a tiny drop of oil where the manual says. Maintenance is not glamorous, but it keeps the hum happy.
The projects that sold me
- Rolled hem scarf: I switched to a 3-thread rolled hem and ran a chiffon remnant through. The edge looked boutique-bought.
- Knit tees: 4-thread overlock for seams, 3-thread narrow for finishing raw edges. No more wavy, sad hems.
- Towel refresh: Serged the sides of low-pile terry cloth — quick gifts that suddenly look high-end.
- Denim picnic quilt binding: I didn’t serge through every thick corner (that’s still a job for my regular machine), but the S0100 handled multi-layer cotton like a champ.
The best part? This thing is portable. It’s light enough that I can stash it in a cubby and pull it out when it’s “sew o’clock.” I’ve even taken it to a friend’s craft night without throwing out my back.
What I wish I’d known on day one
If you found this by searching for Singer S0100 or Singer S0100 reviews, here’s my honest, first-person cliff notes:
- Threading is a learnable skill. The lower looper takes patience the first time, but it clicks (literally and mentally). A bright lamp and tweezers are non-negotiable.
- Check the free-arm cover for accessories. Mine hid the screwdriver, needles, and tweezers in there.
- It may not arrive pre-threaded. Plan on threading it yourself the first day. Use four different colors so you can see which tension to tweak.
- It’s feisty on smooth tables. A mat or grippy shelf liner keeps it from wandering while you sew.
- Noise is subjective. I’d call it “busy office” loud, not “power tool” loud. It settles after a few minutes of sewing.
- Set realistic expectations. It’s a budget-friendly serger that shines on everyday fabrics. Treat it well and it will pay you back in polished seams.
The verdict after living with it
After a month of steady weekend sewing, the SINGER S0100 serger has earned its spot. It turned my knits from “eh” to “oh!” and it finishes raw edges so fast I feel like I’m cheating. My learning curve was mostly about threading and finding my tension sweet spots, not fighting the machine. I keep seeing folks compare models and ask if the S0100 is “enough.” If your goal is clean overlocks, rolled hems, and tidy edges without spending a fortune, it absolutely is.
So here’s my official entry into the pool of Singer S0100 serger reviews from a real person who actually used it: the S0100 won me over. It’s portable, practical, and once you and that lower looper become friends, it’s downright fun. If you’re skimming Singer S0100 reviews trying to decode whether this little serger is hype or help, consider me your friendly nudge. Clear a spot on your table, cue up a threading video, and get ready for seams that look like they came off a professional line. My closet — and my gift pile — haven’t looked this neat in years.
Singer S0100 — Pros & Cons from Customer Feedback
| Pros (what people liked) | Cons (what people didn’t like) |
|---|---|
| Good value for money; price often praised as better than similar machines. | Documentation issues: missing paper manual, confusing or outdated instructions; many had to rely on YouTube. |
| Lightweight & portable; easy to move/store. | Not always pre-threaded despite product pages saying so; leads to a tougher first setup. |
| Can produce clean, strong stitches on knits, terry, denim, and cotton when correctly set up. | Threading difficulty, especially the lower looper and needle area; some say the blade/cutter crowds access. |
| Beginner-friendly for many once they follow video guides; color-coded paths help. | Missing accessories in some shipments (tweezers, screwdriver, extra needles, adapter); packaging sometimes looks “used.” |
| Helpful online tutorials (Singer site/YouTube) make learning easier. | Quality control complaints: units arriving dusty, mis-threaded samples, or looking refurbished. |
| Easy to thread for some owners after a short learning curve; quick wins with practice. | Reliability concerns: reports of machines or foot pedals stopping or doors/latches not closing properly. |
| Works well across common projects: rolled hems, tee seams, towel edges, simple garments. | Noise & vibration: several call it loud; can “walk” on the table without a mat/heavy surface. |
| Smooth sewing once tensions are dialed in; multiple users say “works great.” | Inconsistent stitching/tension out of the box for a minority; frequent rethreading needed for some. |
| Compact “plug-in and go” feel for quick finishing tasks. | No built-in waste catcher and no dedicated light near the loopers, making threading harder. |
| Brand familiarity (Singer) gives confidence to many buyers. | Customer support frustrations: delays in getting missing parts or warranty service locations. |
| Accessories are included on many units and often hidden inside the free-arm cover (once found, it’s convenient). | Tight work area at the needles; people with larger hands/fingers find threading fiddly. |
| Good for first serger owners who are comfortable learning via video. | Some think build feels “plastic/cheap” vs. older/metal models; a few returned it for other brands. |
| Straightforward maintenance (brush lint, occasional oil) keeps it humming. | Model/listing mix-ups (S0100 vs. S0105) confused a few buyers. |
| Many satisfied long-term users: “works perfectly,” “flawless” on fabrics when set correctly. | Expectation mismatch about included thread; most units don’t ship with starter cones. |
Singer S0100 Sewing Machine – Frequently Asked Questions
Where can I find real-world tips from Singer S0100 serger reviews?
From user feedback: expect a learning curve on the lower looper; use bright lighting and tweezers; many accessories may be stored inside the free-arm/extension area; place the machine on a grippy mat to reduce vibration; and don’t assume it ships pre-threaded. These practical notes come straight from aggregated Singer S0100 reviews and Singer S0100 serger reviews shared above.
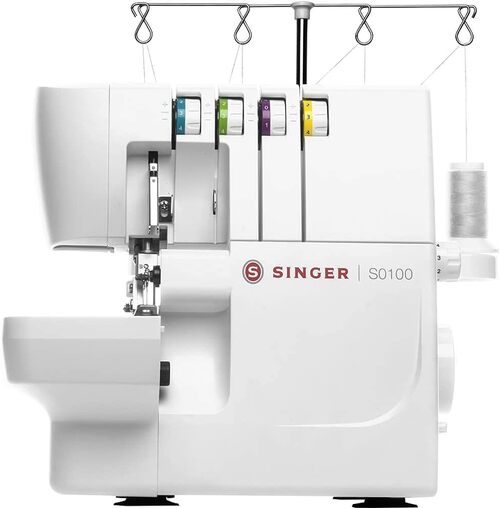
What is the SINGER S0100 serger and what can it do?
Singer S0100 is a compact 2/3/4-thread overlock machine designed for finishing seams, trimming edges, rolled hems, narrow edges, flatlock and stretch overlock. It runs up to 1300 stitches per minute, offers differential feed 0.7–2.0, stitch length 1.0–4.0 mm, stitch width 3.0–4.5 mm (right needle) or 5.2–6.7 mm (left needle), and a ~1.5 mm rolled hem. Some versions include an LED light. These specs come from the official S0100/S0105 instruction manual.
Does the manual cover Singer S0100 and S0105?
Yes — the instruction manual explicitly states S0100 / S0105 on the cover, so the setup and operation guidance applies to both.
Is Singer S0100 pre-threaded out of the box?
Retailers sometimes ship a unit with sample threads for testing, but you should be prepared to thread it yourself. The manual shows a clear color-coded path and the exact order: upper looper (purple), lower looper (yellow), right needle (green), left needle (blue). This matches what many Singer S0100 reviews mention about the learning curve.
What is the correct threading order and color paths?
Thread in this order: 1) Upper looper – purple, 2) Lower looper – yellow, 3) Right needle – green, 4) Left needle – blue. The manual’s diagrams show each path step-by-step and remind you to unthread the needles and re-thread the lower looper first if it comes out.
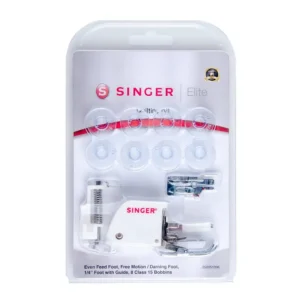
What accessories are included with Singer S0100?
In the box per the manual: 2-thread converter, SINGER/INSPIRA style 2022 needles (#14/90), small screwdriver, and tweezers. (Some owners in Singer S0100 serger reviews report accessories stored inside the machine’s extension/free-arm area.)
How do I open and close the front cover and why won’t the machine sew with it open?
To open: push the cover to the right fully, then pull it down. To close: push up, then slide left until it locks. A safety switch stops the machine from sewing when the front cover is open — this is normal.
How do I set up the telescopic thread stand and place cones?
Extend the telescopic thread stand to full height until it clicks, place cones on the holders, and straighten the threads to avoid tangles before threading.
Which needles does Singer S0100 use?
Use INSPIRA overlock needles, system ELx705, sizes #12/80 and #14/90 as listed in the manual’s specifications and fabric/needle table.
How do I change needles and presser feet safely?
Power off and unplug. Turn the handwheel until needles are at the highest point. Loosen the right (A) or left (B) needle clamp screw, install the new needle with the flat side to the back, then tighten. To swap the foot, raise the presser foot, press the white release button to drop it, align the new foot and click it back on.
How do I disengage or re-engage the upper cutter?
With the cutter raised, open the front cover, push the movable cutter holder to the right, and turn the knob until it clicks to the horizontal non-working position. Turn it up and toward you to re-engage. The manual notes you should sew with the cutter down for overlock so it trims fabric correctly.
What stitches can the SINGER S0100 make?
Supported stitches include 4-thread overlock; 3-thread overlock (wide/narrow), rolled edge and narrow edge; 3-thread flatlock (wide/narrow) and stretch overlock; plus 2-thread versions (overlock, wrap, rolled edge, narrow edge, flatlock) when you attach the 2-thread converter. The stitch tables in the manual list recommended tensions and settings.
How do I sew a rolled hem on Singer S0100?
Move the stitch finger lever to R, set stitch length around N–2 for a fine seam, and follow the manual’s tension recommendations. For 3-thread rolled edge use the right needle; for 2-thread rolled edge attach the converter and use the right needle and lower looper. Tip from the manual: decorative thread in the upper looper looks great.
How do I start sewing, chain off, and cut the thread?
After threading, close the cover, pull all threads over the stitch plate and slightly left under the foot, turn the handwheel to form a chain, then sew a 5–8 cm chain before feeding fabric. At the end, keep sewing while pulling fabric back-left to ‘chain off,’ then use the built-in thread cutter on the left side of the machine.
What do the tension and differential feed controls do?
Tension balances the look of the stitch — looper threads should cross at the fabric edge; tighten or loosen per the manual’s diagrams if the upper or lower looper pulls to the wrong side. Differential feed prevents stretching or puckering: use around N–2.0 for knits to prevent waves and 0.7–N for lightweight wovens to avoid puckers.
How do I adjust stitch width, length, and presser foot pressure?
Width: change needle position (right ≈3.5 mm, left ≈5.7 mm) and fine-tune with the width knob (ranges shown in the manual). Length: set near N for most, 4 mm for heavy fabric, ~2 mm for light fabric. Presser foot pressure: turn the top adjuster — clockwise for more pressure, counter-clockwise for less — and test on scraps.
Does Singer S0100 have a free arm?
Yes. Slide off the flat-bed extension to use the free arm for cuffs and small circular pieces, then slide it back until it snaps to replace.
How do I maintain and oil the SINGER S0100?
Overlockers make lots of lint and run fast, so clean frequently and oil the moving points often with sewing-machine oil only. Unplug before servicing, wipe excess oil, and follow the manual’s lubrication spots.
What basic troubleshooting steps are in the manual?
If fabric won’t feed, lengthen stitch length, adjust presser foot pressure, or check differential feed. If needles break or stitches skip, install new needles correctly and re-thread. If threads break or puckering occurs, re-thread and balance tensions. If the machine won’t run, verify power and that the front cover is closed. The manual’s chart lists fixes by symptom.
What foot control type and safety notes should I know?
Use the specified GTC/HKT 72C (220–240V) or GTE/HKT 7 (100–120V) foot control models listed in the manual. Always unplug before cleaning or adjusting, keep fingers away from moving parts, and never operate with blocked vents or bent needles.
| Specification | Details |
|---|---|
| Models covered | SINGER S0100 / S0105 (same manual) |
| Machine type | 2/3/4-thread overlock (serger); free-arm capability via removable flat-bed extension |
| Max sewing speed | Up to 1,300 stitches per minute |
| Stitch length range | 1.0–4.0 mm |
| Differential feed ratio | 0.7–2.0 (for anti-pucker/stretch control) |
| Overlock stitch width | Left needle: 5.2–6.7 mm; Right needle: 3.0–4.5 mm; Rolled hem width ≈ 1.5 mm |
| Needle system & sizes | INSPIRA ELx705; sizes #12/80 and #14/90 |
| Number of needles / threads | 1 or 2 needles; 2, 3, or 4 threads |
| Needle bar stroke | 27 mm |
| Presser foot lift (rise) | 4.5 mm |
| Lighting | LED light (present on certain models) |
| Dimensions (W × D × H) | 301 × 280 × 270 mm |
| Weight | 6.0 kg |
| Foot control type | GTC/HKT 72C (220–240V) or GTE/HKT 7 (100–120V) as specified in the manual |
| Included accessories | 2-thread converter, SINGER style 2022 needles (#14/90), small screwdriver, tweezers (stored in accessory area) |
| Safety interlock | Front cover safety switch prevents operation while cover is open |