I still remember the day the big brown box with the blue letters landed on my doorstep. I’d spent nights reading Brother PE800 reviews and watching late-night YouTube stitch-alongs, trying to figure out if this was “too much machine” for a newbie who mostly sewed straight lines. Curiosity won. I dragged the box inside, made coffee, and started my own little Brother PE800 review — one cup, one stitch at a time.
Unboxing jitters (and happy surprises)
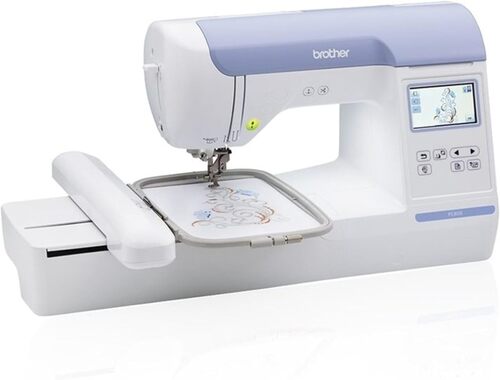
Under the packing foam was a tidy little spaceship: the Brother PE800 embroidery machine, all white curves and a bright color touchscreen winking at me. The 5×7 hoop looked huge compared to the 4×4 I’d borrowed before. There were bobbins, spool caps, a couple of screwdrivers, and that magical lever for the automatic needle threader. I’m not too proud to admit I petted the hard cover and said, “Hi, friend.”
Two things I learned quickly: read the manual (it’s actually good) and keep YouTube nearby for visual brain moments. Within minutes I’d threaded the top path (leave the presser foot up!), loaded a Class 15 plastic bobbin with 90-weight bobbin thread, tapped through the on-screen tutorials, and watched the needle threader pop the thread right through the eye. I felt like I’d just unlocked a cheat code.
First stitch, first grin
My first project was a fast “proof of life”: a cotton tea towel with my last name curved across the bottom. On the Brother PE800 embroidery machine you can type letters, place them on two lines, or arc them into a smile. I nudged the letters with my finger — drag, drop, rotate a smidge — then picked a built-in font and a leaf border from the design library. The color LCD previewed everything clearly (no more guessing at a fuzzy grayscale blob). Deep breath. Start.
The machine hummed. Not clunky, not scary — just a steady purr. The screen told me how many stitches were left and when to switch colors. When I bumped the hoop getting too nosey, I used the 1/10/100 stitch back/forward buttons to hop exactly to the spot before my oops. Ten minutes later I had a towel that looked store-bought. I may have danced in the kitchen.
The “aha” pile: what made it click
- Good supplies matter. 90-wt bobbin thread + decent polyester embroidery thread = smooth sailing. I keep a felt pad behind the spool and sometimes a little mesh net over it so the thread doesn’t slingshot and cause fake “tension” drama.
- Stabilizer is your sidekick. Tear-away for cottons, cut-away for knits, wash-away for freestanding lace — YouTube taught me all that. A light spritz of adhesive helps, but go easy. “Mist, don’t drown.”
- Prewound bobbins are worth it. The PE800 accepts them, and they save time during multi-color designs. (Plastic bobbins only — metal ones confuse the sensor.)
- PES files by USB are stupid-simple. I buy designs from Urban Threads, Embroidery Library, and Etsy, pop the USB in, and the machine shows thumbnails. It sorts newest last, so my “latest find” is always at the end — handy once you know the trick.
Projects that won my heart
After the towel came a parade: a denim tote with a compass rose; bibs for my grandson with chubby cars; a memory bear with the name and dates stitched on the paw. The 5×7 hoop is the sweet spot for names and logos — no rehooping three times for a single word. I even learned to “float” a cap in the hoop for a clean monogram. Bright LEDs flood the work area so I can see every little satin stitch.
On-screen editing is better than I expected. I can combine two or three designs, drop text in an arc, and audition thread colors on the touchscreen before I commit. If I get carried away and mess with sizes too much, a quick reset puts defaults back in place.
Where it tripped me (and how I got past it)
It wasn’t all roses. Early on I had a run of thread breaks that made me grumpy. Turned out I’d threaded the top path with the presser foot down (rookie move) and used flimsy stabilizer on a stretchy tee. Once I rethreaded with the foot up, switched to cut-away, and slowed the speed a notch in the settings, the tantrums vanished. Another day I thought the machine “ate” my project — birdnest city under the hoop. The fix was simple: remove the hoop, snip from below, pop out the bobbin case, clear lint, rethread top and bottom, and use a new 75/11 embroidery needle. Back to purring.
The auto needle threader skipped a few times until I learned the needle has to be at its exact threading height. Now it works like a charm 9 times out of 10. And yes, the low-bobbin warning is shy on mine, so I peek through the bobbin window before long color blocks. Small habits; big peace.
Hoops, cousins, and compatibility
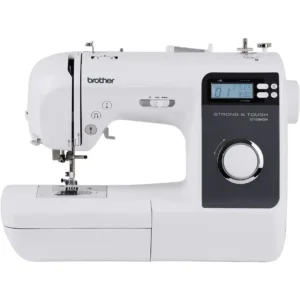
I came to the PE800 from a little Brother combo machine. Heads-up: the 4×4 hoops from my older SE model didn’t fit the PE800 (different bracket style). But my neighbor’s PE770 hoops clicked right on. If you’re upgrading, that detail matters. I bought an extra set of hoops, including a narrow one for sleeves, and it sped me up more than I expected — one hoop stitching while the next is already stabilized and ready.
What it is (and isn’t)
The Brother embroidery machine PE800 is embroidery-only. That was perfect for me — I keep a separate sewing machine for hemming and piecing. If you want to sew and embroider on one machine, this isn’t the one. Also, like every single-needle machine, it stitches one thread color at a time. Most designs have built-in “stops,” so color changes are calm and organized, but you’re still swapping spools. I kind of enjoy the rhythm.
The built-in fonts are cute and clean, but for teeny-tiny quilt labels I grabbed Embrilliance Express (free) to type names neatly and save as PES. If you want to digitize your own artwork from scratch, you’ll need separate software — that’s normal in this hobby.
Six months in: the long view
I’ve put hundreds of thousands of stitches on my Brother PE800, and it still feels fresh. It remembers position after a power bump, which is a lifesaver. The machine is quieter than I expected, bright as daylight, and the color screen is clear enough that I rarely squint. My favorite quality-of-life touches:
- 1/10/100 stitch jump to fix goofs quickly
- On-screen crosshair to see exactly where you’re landing
- USB loading that just…works
- Built-in tutorials for those “wait, how do I…?” moments
My wish list? A bigger hoop someday (stitch fever never sleeps), a slightly larger touchscreen, and thumbnails that show file names more clearly. Those are nice-to-haves, not dealbreakers.
Who I think will love it
If you’re sifting through Brother PE800 embroidery machine reviews wondering if this model is hype or help, here’s my plain-English take:
- Beginners will feel safe. The learning curve is real but friendly. Read the manual, watch a couple videos, start with the built-ins, and you’ll be off.
- Crafters and side-hustlers will get a reliable workhorse. The 5×7 field covers 90% of the monograms, logos, and names people ask for.
- Upgraders from 4×4 will wonder why they waited. Space to breathe changes everything.
My bottom line
This is the part of the Brother PE800 review where I’m supposed to sound fancy, but honestly? The Brother PE800 made me braver. It turned blank towels into wedding gifts, tiny tees into birthday smiles, and a stack of fabric scraps into a quilt label that made my aunt cry in the best way. It’s not fussy if you feed it good thread, the right stabilizer, and a little patience. It forgives small mistakes and lets you fix them without starting over. It’s steady, bright, and — most days — quietly delightful.
If you need a sign, here it is: the Brother PE800 embroidery machine is the real deal. And if this whole letter reads like one long love note, that’s because it is — stitched in satin, with a tidy under-side, and my name arced just so across the bottom.
What real customers say in their Brother PE800 reviews?
| Pros (What customers like) | Cons (What customers dislike or struggle with) |
|---|---|
| Beginner-friendly & easy setup — many first-timers say they were embroidering within minutes, with the manual and YouTube helping a lot. | Thread/bobbin/tension hiccups — some users report thread breaks, bird-nesting, bobbin thread pulling to the top, or needing fine tension tweaks. |
| Clear color touchscreen — easy previewing of designs, colors, stitch progress; on-screen 1/10/100 stitch jump and position memory after power loss praised. | Tech support & service — multiple reviews cite difficulty reaching helpful support, long service backlogs, or being told to travel to service centers. |
| Quality stitch-out — smooth, consistent results; many call it a “workhorse” for everyday projects and small business use. | Quality-control/packaging issues for some — a few received units with missing parts, used condition, broken auto-threader, early “safety device” errors, squeaks. |
| 5″×7″ hoop size — big upgrade over 4″×4″ for names/logos without rehooping; some also like optional multi-position/larger hoops. | Hoop pain points — hoops not interchangeable with some older Brother models (e.g., SE-series), attachment can feel finicky, and one user dislikes the hoop design. |
| On-machine editing — combine designs, arc text, move/resize on screen; helpful for quick personalization. | Editing/fonts limitations — built-in fonts can’t go tiny enough for some quilt labels; on-board editing called “basic” by a few. |
| USB PES loading is simple — plug in a flash drive and stitch; wide compatibility with designs from popular sites. | No bundled digitizing software — several users expected/desired software; real editing/digitizing requires separate (sometimes pricey) programs. |
| Automatic needle threader — frequently loved when used at the correct needle height. | Auto-threader reliability varies — some report misfires or failures over time. |
| Bright LEDs & relatively quiet — good visibility and comfortable sound level for home use. | Interface/ergonomic nitpicks — one user finds the screen “pixelated”; another dislikes the presser-foot lever placement (on the back). |
| Good value for money — multiple upgrades vs older models (e.g., PE770), yet affordable; suitable for gifts, hobbyists, and side hustles. | Single-needle = manual color changes — expected for this class, but some still call it inconvenient on multi-color designs. |
| Reliable with proper supplies — customers emphasize success using 90-wt bobbin thread, quality stabilizers, and spool nets/felt pads. | Learning curve on certain fabrics — stretchy/knit items need the right stabilizer/technique; beginners may face a short setup/hooping learning curve. |
| Lightweight/portable — easy to bring to classes or clubs. | Not a combo machine — embroidery-only; a few returned it after realizing it cannot do regular sewing. |
Brother PE800 — Your Most-Asked Questions Answered
What is the Brother PE800 and who is it best for?
The Brother PE800 is an embroidery-only machine with a 5''×'7' embroidery field, a color LCD touchscreen, and a USB port for loading designs. It’s beginner-friendly but powerful enough for hobby sellers who want clean, consistent stitch-outs. (Think of this as your quick, reliable single-needle shop.) This Brother PE800 review is based on the official manual plus real-world user feedback.
Does the Brother PE800 sew regular stitches too?
No — this model is embroidery-only. If you need standard sewing, choose a combo machine; the Brother embroidery machine PE800 is dedicated to embroidery tasks.
What size hoops can I use?
Included: a 5''×7'' hoop (18×13 cm). Optional hoops include 4''×4'', 1''×2.5'', and a 5''×12'' multi-position frame for larger split designs. The screen can filter designs by hoop size so you don’t pick one that won’t fit.
Which files and how do I import designs?
Load Brother-compatible designs (commonly PES) from a USB flash drive — plug the drive into the machine’s USB port and select the design on the color LCD. Many owners in Brother PE800 reviews use Etsy and other design shops successfully.
What’s in the box?
Typical inclusions: embroidery foot (Q), 5''×7'' hoop, 4 plastic bobbins, spool caps, spool net, needle set, screwdrivers, scissors, cleaning brush, an extra bobbin case set for embroidery, 90-wt bobbin thread, a dust cover, and printed guides. (Exact contents can vary by region.)
Is the Brother PE800 easy to learn?
Yes. The touchscreen shows clear steps, there’s a built-in Help menu, and the manual walks you through “Embroidery Step-by-Step.” Most beginners in Brother PE800 embroidery machine reviews report getting usable results on day one.
What needles, bobbins, and thread work best?
Use a 75/11 embroidery needle, Class 15 (SA156) plastic bobbins, and 90-wt bobbin thread. Quality embroidery top thread plus proper stabilizer gives the best results — this combo is echoed in many Brother PE800 reviews and the manual.
Can I edit designs on the screen?
Yes — move, resize, rotate, mirror, arc text, change on-screen thread colors, combine multiple designs, and preview needle position before stitching. You can also resume after a power interruption and step backward/forward by stitches.
Do I need extra software?
Not to use built-in designs or purchased PES files. However, if you want to digitize your own logos from scratch, you’ll need separate embroidery software (not included). That’s a common note in many Brother PE800 revie
Why is my thread breaking or looping on top?
Typical fixes: rethread top and bobbin, use 75/11 needle and 90-wt bobbin thread, match stabilizer to fabric, slow down if needed, and try the included spool net for slippery or metallic threads. If looping appears, adjust upper thread tension per the manual.
Can the Brother embroidery machine PE800 handle thick items like towels or hats?
Yes — with the right setup. Keep total fabric thickness under ~3 mm, stabilize properly, and consider “floating” small or tricky items (like hat fronts or edges) on hooped stabilizer using temporary adhesive or basting. Many owners report success on towels, beanies, and hat fronts.
How do I position designs accurately?
Use the on-screen frame outline and needle-position check to trace the stitch area before you start. You can preview corners/center and nudge placement on the LCD to land exactly where you want.
What maintenance does it need? Do I oil it?
Routine oiling isn’t required. Keep lint out of the hook/race area, clean per the manual, and watch for the maintenance reminder. If issues persist, check the troubleshooting table or a service center.
Any safety or setup tips?
Unplug when not in use, keep fingers away from the needle, attach the embroidery unit only with the power off, and secure hoops correctly so the foot cannot hit the frame. Place heavy projects fully on the table so they don’t drag.
What do real users like — and not like — about it?
From Brother PE800 reviews: Pros — easy to use, crisp stitch quality, reliable auto-threader (most), helpful color LCD, generous 5×7 field, simple USB imports. Cons — some report hoop compatibility quirks with older models, a learning curve with tension/hooping, and that digitizing software is extra. Overall sentiment in Brother PE800 embroidery machine reviews is strongly positive for beginners and serious hobbyis
What accessories should I add first?
Popular add-ons: extra hoops (4×4 and the 5×12 multi-position), quality stabilizers (tear-away, cut-away, water-soluble), spare Class 15 bobbins, sharp embroidery scissors, and good polyester embroidery thread. Optional frames and stabilizers are listed in the manual’s accessories section.
| Model | Brother PE800 |
|---|---|
| Machine Type | Computerized, embroidery-only machine (embroidery unit, operation panel, and embroidery workflows are built-in). |
| Maximum Embroidery Area | 130 × 180 mm (5″ × 7″) with the large frame. |
| Compatible Frames | Large 130 × 180 mm (5″ × 7″) included; optional medium 100 × 100 mm (4″ × 4″) and small 20 × 60 mm (1″ × 2½”); multi-position frame supported for split designs. |
| Display & Controls | LCD touch panel with on-screen keys (Help, Settings, Embroidery, etc.) and Start/Stop, Needle Position, and Thread Cutter buttons on the head. |
| On-Screen Editing | Move, resize, rotate, mirror; change thread colors; edit/arrange character patterns; combine multiple patterns; zoom/magnify; frame identification view; adjustable background color & thumbnail size. |
| Thread Management | Built-in needle threader; automatic thread cutting at end of each color (toggle on/off). |
| Speed Control | Adjustable “Max Embroidery Speed” (spm) from the settings screen; can be changed mid-project. |
| Recommended Threads | Use embroidery upper thread; use embroidery bobbin thread (machine is set for ~90-weight bobbin thread). |
| Color & Brand Charts | On-screen display supports thread names/numbers for multiple brands (e.g., Madeira, Sulky, Robison-Anton). |
| Connectivity & Storage | USB port for importing/exporting embroidery data; save to machine memory or USB flash drive; recall from USB. |
| Resume/Recovery | Project resume and stitch navigation functions if thread breaks or power is cycled. |
| Included Accessories (in the box) | Embroidery foot “Q”; needle set; 4 bobbins; seam ripper; scissors; cleaning brush; large/small/mini screwdrivers; 3 spool caps; thread spool insert; spool net; bobbin case (no color on screw); large 5″×7″ embroidery frame set; polyester 90-weight bobbin thread. |
| Power | Main power switch and power supply jack (standard household outlet). |