Why I Chose the Brother PE535
I remember the morning my Brother PE535 landed on my doorstep like it was a little white spaceship for thread. For weeks I’d been scrolling through Brother PE535 reviews at midnight, convincing myself that an embroidery-only machine wouldn’t be “too much.” My old sewing machine could handle hems, but I wanted names on baby blankets, patches for my nephew’s jacket, and labels for my quilts. Time to bring a new player onto the team: the Brother embroidery machine PE535.
Unboxing the Brother PE535 Embroidery Machine
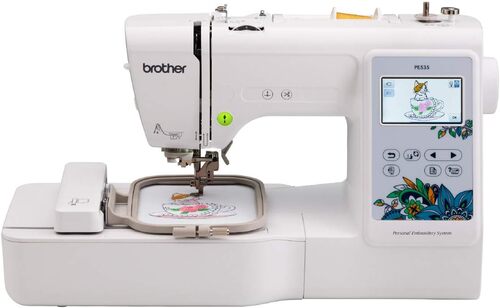
Unboxing felt like opening a craft-store snow globe. The Brother PE535 embroidery machine sat tucked under a snug cover, already wearing its embroidery foot, with the 4×4 hoop clipped in like it came ready to work. I set it on my desk, plugged it in, and the color screen blinked awake. The prompts were friendly, almost chatty: thread here, drop the bobbin there, lock the foot, tap to start. I’m not particularly techy, but the path was numbered and the bobbin clicked into place with a satisfying “yep.”
First Stitch Magic
My first project was a simple monogram on a canvas tote. I used cut-away stabilizer, a fresh 75/11 needle, and slowed the speed until my shoulders stopped living up by my ears. The motor purred; the needle danced. When the last satin stitch landed, I lifted the hoop and actually laughed. It looked…store-bought. Not “first try” at all. That moment sold me on the Brother PE535.
Getting Braver with USB Designs
Then I got brave. I pulled a tiny dinosaur design from a USB stick and stitched it on a kid’s T-shirt. Next came quilt labels for a memory quilt, a pair of eyes for a charity doll, and a little heart for the corner of a hand towel (water-soluble topper was the secret there). The screen let me rotate, resize, and scoot designs around until they felt right. I loved watching the color steps tick by, like a recipe that always works when you follow it.
The 4×4 Truth (And How I Work Around It)
Of course, I met the 4×4 reality pretty quickly. The Brother PE535 is honest about its size: it’s a small canvas with a big imagination. When I wanted a larger crest for a hoodie, I learned to split a design into sections and re-hoop carefully, or rethink the art so it fit the frame. For fast, big logos on a dozen shirts? This isn’t that machine. But for names, patches, pockets, onesies, and quilt corners, it’s perfect.
Bumps, Nests, and Easy Fixes
Not everything was smooth. One afternoon I ignored the stabilizer and tension wisdom and got a glorious bird’s nest under the plate. I took a breath, popped off the plate, cleared the tangle, rethreaded top and bobbin (always rethread both!), and tried again — slowly. Lesson learned. Another day the needle threader threw a tiny tantrum; I swapped to a new needle and it behaved. I also discovered that cheap thread is false economy — good embroidery thread and 90-weight bobbin thread make the stitches sing.
Embroidery-Only by Design
People online sometimes expect it to be a combo machine; it isn’t. The Brother embroidery machine PE535 does embroidery only, which I actually love because it stays set up for that one job and does it well. For hems and zippers I keep a basic sewing machine nearby. That combo keeps my projects moving without constant reconfiguration.
Finding My Rhythm
After a few weeks, I built a rhythm: pick the right stabilizer, hoop firmly but not drum-tight, slow the speed for tricky areas, and change needles more often than I think I should. I keep a little box of pre-wound bobbins, a pair of sharp snips, and a USB with my favorite .pes designs. The machine remembers where it left off if I need to step away, and the screen’s little “are you sure?” nudges saved me from more than one oops.
A Tiny Appliqué, A Big Grin
My favorite moment so far? A tiny appliqué letter on my niece’s backpack. She watched the outline stitch, the tack-down, the satin border — mesmerized. When we clipped the last jump thread, she whispered, “We made that.” That’s the magic the PE535 brings to my workspace: quick wins that look like I bought them from a boutique.
Six Months Later — My Honest Take
Six months in, here’s my honest take. The Brother PE535 is small, steady, and surprisingly capable for the price. It’s friendly to total beginners and fast for quick gifts. The 4×4 hoop will nudge you to plan smarter or upgrade later if your art grows giant, but I don’t regret starting here for a second. If you’re comparing notes and combing through Brother PE535 reviews like I did, know this: with decent thread, the right stabilizer, and a little patience, this machine can make your ideas real, one tidy satin stitch at a time.
Final Verdict: Would I Buy It Again?
Would I buy it again? Absolutely — for what I use it for. The Brother PE535 doesn’t try to be everything. It’s the helpful friend who shows up with a neat alphabet, a USB port, and a calm voice on the screen. It cheers when you monogram a towel, forgives you when you nest a bobbin, and quietly asks, “Another one?” And most days, my answer is yes.
What real customers say in their Brother PE535 reviews?
| Pros (What people like) | Cons (Common complaints about) |
|---|---|
| Beginner-friendly & quick setup. Many first-time users were stitching within minutes/hours; on-screen, step-by-step prompts and clear manuals help. | Small 4″×4″ hoop. The most frequent gripe; limits design size and pushes some users to upgrade later. |
| Good stitch quality for the price. Results often described as “clean,” “professional,” and “consistent” on small projects. | Embroidery-only. Several buyers expected sewing + embroidery; you’ll need a second machine for regular sewing. |
| Great value entry point. Frequently praised as affordable for learning/customization; nice gift for beginners. | Jams, “bird’s nests,” and tension sensitivity. A subset report bobbin/thread tangles and a learning curve with stabilizers and tension. |
| Easy to learn with videos. YouTube/TikTok tutorials + intuitive interface made the learning curve manageable. | Needle/needle-threader issues. Reports of the auto threader failing, needles loosening/breaking, and occasional replacements. |
| USB import of designs. Users enjoy adding free/paid designs; good for monograms, labels, patches, and personalized gifts. | Hooping & thicker fabrics can be tricky. Some struggle getting the frame around anything thicker than light fabric; a few mention stripped hoop screws. |
| Lightweight & compact. Handy for small spaces and taking to classes; easy to store. | Noise & QC variability. A minority received loud/defective units (metal sounds), poor packaging, or missing accessories. |
| Color touchscreen helps. Simple graphics and prompts guide threading, placement, and troubleshooting. | Touchscreen not always perfect. A few say it can be less responsive, requiring extra taps. |
| Works out of the box. Many could stitch first projects day one; minimal fiddling if directions are followed. | Extra costs add up. You’ll likely need stabilizers, extra needles, embroidery thread, a USB stick, and (optionally) digitizing software. |
| Good for kids/teens (with guidance). Several grandparents/parents bought it as a starter machine; fun for family projects. | Limited built-in fonts/designs. Some wanted more fonts or bundled software; creating your own designs often needs separate software. |
| Durable for personal use; “workhorse” reputation. Long-term owners praise reliability for hobby use; even business users note strong output until very high stitch counts. | Not ideal for production logos. Manual color changes + small hoop make multi-shirt logo runs slow. |
| Clear threading/bobbin path (especially for Brother owners). Familiar threading reduces setup friction. | Regional voltage note. International buyers mentioned needing a step-up transformer (110V vs 220V). |
| Fun factor. Users repeatedly say it “opens up” crafting options and keeps them excited to create. | Customer service/return hiccups. A few cite mixed experiences with sellers and RMA/refunds. |
Brother PE535 — Your Most-Asked Questions Answered
What is the Brother PE535 and who is it for?
The Brother PE535 is a compact, embroidery-only home machine with a 4x4 inch (10x10 cm) max embroidery area. It’s built for household use and suits beginners, hobbyists, and gift makers who want clean, personalized designs without a huge learning curve.
Does the Brother PE535 sew regular stitches?
No. The Brother PE535 embroidery machine is dedicated to embroidery. It ships with the embroidery foot and a 4x4 frame rather than general sewing feet, so plan on a separate sewing machine if you also want standard stitching. Many Brother PE535 reviews mention this as a common surprise for first-time buyers
What comes in the box?
Typical inclusions are the embroidery foot ‘Q’, needle set (75/11 and 90/14), bobbins (with pre-wound 90-weight white embroidery bobbin thread), scissors, cleaning brush, screwdrivers, spool caps, spool net, an accessory bag, manuals, an Embroidery Design Guide, and a 4x4 inch frame. Exact contents can vary by model.
What hoop sizes and upgrades can I use?
Out of the box you get a 4x4 inch frame. Optional frames include a small 1x2.5 inch and a repositionable 6.7x4 inch frame; the actual stitchable area remains 4x4 inches, but the repositionable frame lets you cover a longer area without re-hooping the fabric.
Which file formats and USB features are supported?
You can import .pes, .phc, and .dst designs via USB. Saved or customized patterns can be stored in machine memory or on a USB drive (they’re saved to a ‘bPocket’ folder). .dst files show by name and may need color tweaks on screen.
Can I resume a design after a power cut or if the thread breaks?
Yes. If the thread breaks or the bobbin empties, stop, rethread or replace the bobbin, then use the step-back keys to move a few stitches before the break and continue. If power is turned off, the Brother PE535 saves the current color and stitch number so you can resume next time.
How do I set thread tension on the Brother embroidery machine PE535?
Use the top tension dial; for embroidery, a typical range is 2 to 6. Correct tension shows a hint of top thread on the underside. If the bobbin shows on top, loosen the top tension; if stitches look loose, tighten slightly. Rethread if correct tension can’t be reached.
What threads and stabilizers work best?
Use embroidery thread on top and 90-weight embroidery bobbin thread in the bobbin. Always use stabilizer, especially for stretch, light, coarse, or napped fabrics. For towels or sheer fabrics, water-soluble stabilizer helps. Keep fabric under 2 mm thickness in the frame.
How does the color touch screen help during stitching?
The capacitive touch keys let you select patterns, get on-screen help, adjust settings like the buzzer and needle stop, and lock controls during needle or foot changes. You can also change the on-screen thread display to show color names or brand thread numbers. If needed, adjust key sensitivity.
What’s included in Brother PE535 reviews about ease of use?
Most Brother PE535 reviews highlight quick setup, beginner-friendly operation, and tidy results after reading the manual or watching short videos. Common tips include using proper stabilizer, fresh needles, and practicing hooping for best stitch quality
Any common complaints from Brother PE535 reviews?
Frequent themes are the 4x4 hoop being limiting for larger art, the machine being embroidery-only (not a combo), occasional needle threader or bobbin issues, and the need for good hooping and tension technique to avoid jams. Many of these are solved by correct threading, proper stabilizer, and tension settings per the manual.
How do I bring in custom fonts or logos?
Load compatible .pes, .phc, or .dst files from USB. You can save and retrieve edited patterns on the machine or USB. If a .dst lacks thread colors, pick your palette on the screen before stitching. The Brother PE535 embroidery machine doesn’t digitize by itself; you’ll need software to create designs from images.
Does the Brother PE535 have built-in maintenance needs?
User oiling is not required and is restricted. Keep the race and screen clean using the recommended method. If you hear unusual noise or the handwheel becomes stiff, stop and contact authorized service.
Can I update the machine’s software?
Yes. Download the upgrade file to a USB drive, start the machine while holding the needle position button, insert the USB, and follow the on-screen prompt to complete the update.
How do I hoop fabric correctly on the Brother PE535 embroidery machine?
Fuse or secure the stabilizer to the fabric, place fabric and stabilizer in the frame on a flat surface, and pull it taut without distortion. Use the correct size frame to avoid hitting the presser foot, and keep fabric thickness under 2 mm.
Is the Brother PE535 good for business or bulk logo runs?
For small-batch gifts, patches, and monograms, yes; many Brother PE535 reviews praise it for this. For frequent multi-color logos, expect manual thread changes and the 4x4 limit—some shops outgrow it and move to larger-hoop or multi-needle models.
| Specification | Details |
|---|---|
| Model | Brother PE535 (Operation Manual: Embroidery Machine, Product Code 888-M36/M37) |
| Machine Type | Embroidery-only, intended for household use |
| Maximum Embroidery Area | 10 cm (H) × 10 cm (W) — 4″ × 4″ |
| Included Embroidery Frame | Medium frame: 10 cm × 10 cm (4″ × 4″) |
| Optional Frames / Hooping | Large (repositionable) frame: 17 cm × 10 cm (≈6.7″ × 4″) for multi-position stitching without re-hooping (embroidery area remains 10 × 10 cm); Small frame: 2 cm × 6 cm (≈1″ × 2.5″) |
| Built-in Display & Controls | On-board LCD with capacitive touch operation keys (Help key, Settings key, Embroidery key, Back, Presser foot/Needle exchange lock) |
| Pattern Editing Features (on machine) | Size/scale, rotate, mirror, character spacing, thread density adjustments; split embroidery and pattern alignment tools |
| Memory & USB | Save/retrieve designs to internal memory or USB flash drive; machine writes to the bPocket folder on USB media |
| Supported Design File Formats (USB) | .pes, .phc, .dst (Tajima) |
| Software Upgrade | Upgradable via USB flash drive (follow on-screen upgrade procedure) |
| Recommended/Notable Threads | Pre-wound bobbin supplied (90-weight white embroidery bobbin thread); embroidery bobbin thread (90-weight) available as optional supply |
| Included Accessories (in the box) | Embroidery foot “Q” (installed); needle set (75/11 ×3, 90/14 ×1); bobbin; pre-wound bobbin (90-wt white); bobbin clip; seam ripper; scissors; cleaning brush; screwdriver; disc-shaped screwdriver; spool caps (large/medium installed/small); thread spool insert (mini-king); bobbin case (installed); spool net; medium 10×10 cm frame; accessory bag; Operation Manual; Quick Reference Guide; Embroidery Design Guide |
| Selected Optional Accessories | Repositionable large 17×10 cm frame; small 2×6 cm frame; stabilizer materials; water-soluble stabilizer; 90-wt embroidery bobbin thread |